Cookies
About Cookies
Cookies are small text files on your system, used to keep track of settings or data for a particular site. Web sites can use cookies to identify a returning user or to pass information between Web pages in a single visit.
There are two types of cookies: temporary and permanent. Temporary cookies are used and tracked by the browser to pass information and are deleted once the browser is shut down. Permanent cookies are stored on your system and can be accessed again for multiple visits. Permanent cookies usually have an expiration date and will be automatically deleted from your system at that time. Internet Banking uses temporary cookies and may use permanent cookies, but never passes private information through cookies.
Internet Banking also uses a different kind of temporary cookie known as a session cookie, a non-persistent cookie, or a pre-expired cookie. This cookie is used as part of the stringent security measures in Internet Banking to make sure that each page in Internet Banking is not cached or saved on your system. This means that each page must be retrieved from the Web server. This cookie is deleted when a user logs or times out of Internet Banking or if the browser window is closed and ensures that another user on the same computer cannot access the previous user's Internet Banking session or information.
If you use Enhanced Security, Internet Banking may place a secure permanent cookie on your computer. This secure cookie is unique, and when used in combination with your login information, creates a unique way to identify you to the system. For every login attempt after you add extra security to a computer, this secure cookie is validated along with the login identification you normally enter. This secure cookie is only used to validate your identity and does not contain any personal information.
Enable Cookies on a Computer
Safari Settings
- Open Safari
- From the menu bar, click/select the Safari menu
- From the Safari menu, select "Preferences"
- In the Preferences window, click the "Security" icon/tab
- In the "Web Content" section,
Click (ON) the checkbox for "Enable plug-ins"
Click (ON) the checkbox for "Enable Java"
Click (ON) the checkbox for "Enable JavaScript" - Unclick (OFF) the checkbox for Block popup windows
- In the "Accept Cookies" section, select the "Always" radio button
- In the Preferences window, click the "AutoFill" icon/tab
- Unclick (OFF) the checkbox for "Usernames and passwords"
- Close the Preferences window
Microsoft Edge Settings
- Open Microsoft Edge
- Click on the “Settings and More” button (3 dots) in the top right corner
- Click on “Settings"
- Click on "Privacy and Security" (the Pad Lock)
- Under Cookies, select “Don’t block cookies”
- Refresh your browser
Google Chrome Settings
- From the Tools icon select "Settings"
- Under the "Privacy" section, select "Content settings"
- Cookies: Allow local data to be set (recommended). If desired, a user may choose to block cookies. If this option is chosen, the user can allow only specific sites to place cookies by using the "manage exceptions" option. Adding the URL of the Online Banking site here would allow the user to block other sites from placing cookies, while allowing Online Banking to remember the user's personal computer as a trusted access point.
- JavaScript: Allow all sites to run JavaScript (recommended)
- Security: From the "Tools" icon select "Settings"
- Click "Show advanced options"
- Click "Change Proxy settings"
- Click on the "Advanced Tab"
- Check the box next to "Check for server certificate revocation"
Mozilla Firefox Settings
- From the menu bar, click on "Tools"
- From the Tools menu, select "Options"
- In the Options window, select the "Privacy" icon
- Check If the "Firefox will" dropdown option is "Never remember history," cookies will be deleted from the browser upon browser close; if user is experiencing trouble with the MFA cookie, you can change the option to "Remember history" so that the cookie remains between sessions
- If the "Firefox will" dropdown option is "Use custom settings for history," ensure that both the "Accept cookies from sites" and "Accept third-party cookies" boxes are checked (ON) and the "Keep until" dropdown option value is "they expire.
- In the Options window, select the "Content" icon
- Uncheck (OFF) the checkbox for "Block Popup Windows". Or if you choose to have it checked (ON), be sure to add your FI's domain to the list of Allowed Sites
- Click on OK button to close the Options window
Opera Settings
- Open Opera
- Click on the “Tools” menu Opera
- Click “Preferences”
- Change to the Advanced tab
- Click on “Cookies”
- Select “Accept cookies”
- Click OK
Enable Cookies on Mobile Devices
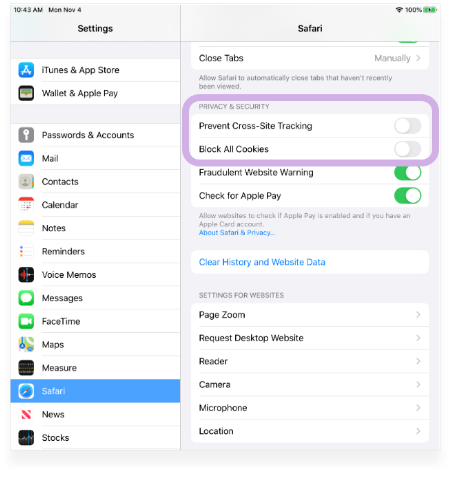
Safari Settings
- Open the Settings app on your iPhone or iPad
- From the left navigation menu, open Safari
- Under Security & Privacy, disable both "Block All Cookies" and "Prevent Cross-Site Tracking".
Note: "Block All Cookies" can sometimes be found under the Advanced tab - Quit and restart the Safari app